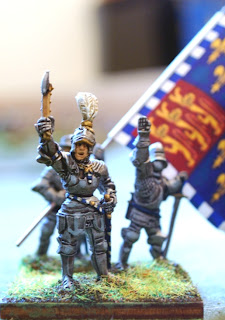
Here are the ward commanders beginning with the vanward and proceeding down the line.
First we have Edmund Beaufort, 4th Duke of Somerset (and his infamous axe). One of the myths surrounding the Lancastrian collapse on the field is that Somerset, in his rage at John Wenlock over his lack of support for Somerset's (botched) flanking maneuver, caved in the old soldier's skull with his axe--an act which helped precipitate the rout. He was facing Richard, Duke of Gloucester across the field (as Edward IV had his vanward on the left, presumably to match his more skilled younger brother against the slightly more experienced Beaufort, rather than leaving the job to Hastings, who had performed poorly at Barnet in the weeks prior).
 |
| 'Souvent me souvient!' (Somerset = Perry metal; others = Old Glory 25's) |
In the mainward we have the tough ol' John, Lord Wenlock. Wenlock had once been on the Yorkist side, but that was because he was a devoted follower of the Earl of Warwick. When Warwick betrayed to Margaret of Anjou, he took his seasoned commander with him. For the scenario, I have put Edward of Westminster, Prince of Wales with Wenlock in a sort of 'understudy' role and as an objective for the Yorkist forces. Wenlock was pitted against the ever-doughty (and later doughy) Edward IV.
 |
| Not even his turtle-like appearance could save him from Somerset's fury. (Wenlock = Perry metal; others = Old Glory 25's) |
 |
| The eighteen-year-old needs a little advice from the Hospitaller John Langstrother. (Edward and Langstrother = Perry metal; others = Old Glory 25's) |
Bringing up the rear is John Courtenay, 15th Earl of Devon. Devon was squared off across the field from Lord Hastings. He was not particularly influential in the battle from reports, since it was largely decided on the other side.
 |
| All dressed up, nowhere to go. (Devon = Perry metal; others = Old Glory 25's) |
I hope you enjoy the photos! Good gaming to all.
S. V. B. E.
The Fox

Very nicely painted, the flags look great too.
ReplyDeleteSteve
Excellent figures. Love the flags!
ReplyDeleteLovely work!
ReplyDeleteCracking brushwork!
ReplyDeleteCheers
paul
They are all excellently painted, but I like the Hospitaller best. Dean
ReplyDeleteFantastic.... loved the figures and the flags
ReplyDeleteThanks so much to everyone for the compliments!
ReplyDeleteCheers!
Just come across your blog on LAF.
ReplyDeleteA very good find for me as I have two Medieval blogs running at present and i'm always interested in reading (and seeing!) what other folks are up to in the Late Med. 'period'.
Fantastic stuff with the heraldry mate.
Darrell.
Thanks, Darrell! I appreciate the comments. I have seen your work and have been an admirer for some time.
DeleteP.S. Sorry to hear about the recent trauma to your opposable digit!
Absolutly beautiful, great work!
ReplyDeleteLovely painting jobs!!
ReplyDelete